Getting Started with ArcGIS Pro Notebooks
ArcGIS Pro notebooks provide users with an interactive environment for running Python code, automating workflows, and conducting geospatial analysis. They combine the power of Python with the spatial capabilities of ArcGIS Pro to help you streamline tasks and visualize data seamlessly. This guide will walk you through the basics of how to get started with notebooks in ArcGIS Pro.
The Map & Data Library has some sample ArcGIS Pro notebooks available here. We also have other workshops on Python through Jupyter. Please feel free to explore our previous Python workshops and tutorials if you are looking to learn more.
Working with Notebooks
Notebooks are a Python-based program file that users can interact with. It is a document-style workspace that allows you to combine code, output, and visualize data in a single environment. Work is conducted in a file type called .ipynb. These are “interactive Python notebook” files that are formatted into a notebook structure. Python code can be run in blocks or cells directly within ArcGIS Pro, which reduces the siloed workflow between traditional Jupyter Notebooks and desktop GIS software.
Typically, notebooks are run through Jupyter, an open-source interface for manipulating notebooks. UofT also hosts a web-based platform for JupyterHub.
Creating a Notebook in ArcGIS Pro
-
With your ArcGIS Pro open, navigate to a new or an existing project.
-
Notebooks are nested within your projects, so be sure to select the correct project environment for where you want to create your notebook.
-
-
Create a New Notebook.
-
There are multiple methods of creating a notebook:
-
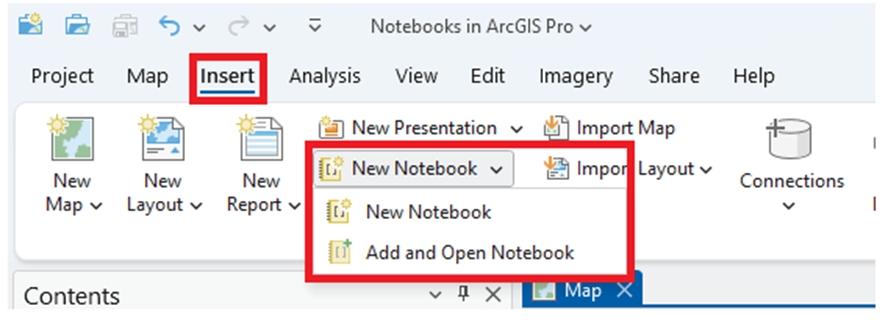
Click the Insert tab on the top ribbon, and click the New Notebook button.
-
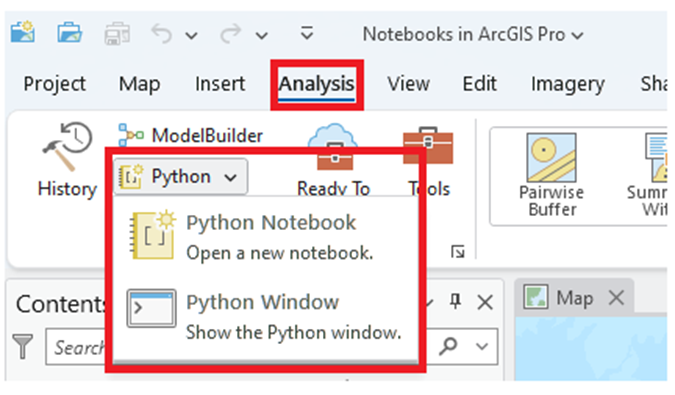
Another method is going to the Analysis tab, and going to Python, where you can open a new notebook.
-
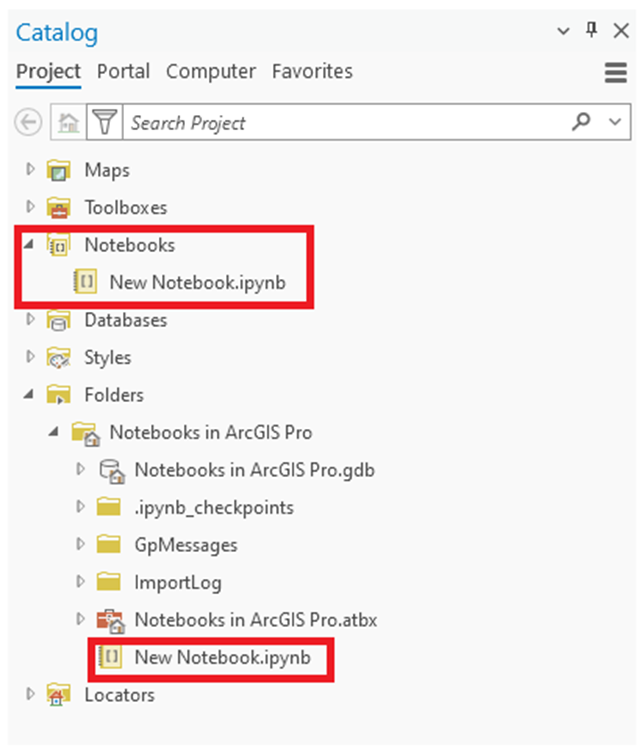
Or you can access the Catalog pane, and navigate your project directory (project geodatabase) where you can right click and select New > Notebook. Notice that once you add a notebook, a new folder will be created storing all your notebooks.
-
-
Notebooks open in your view and can be snapped to a particular region by holding the tab. It will start as an empty file with a blank cell, where you can begin writing your Python code.
-
Opening an Existing Notebook
- Existing Notebooks can be opened through your project Catalog pane.
- Browse to the Notebooks folder within your project.
- Right click the notebook you identified and select Open.
- If you would like to add a notebook from a file that has been shared with you / a file in another folder, you can do this by clicking the Insert tab on the ribbon, and click the Add and Open Notebook button (similar to Step 2ai). This will open your file explorer, allowing you to browse the directory in which the notebook file is located.
- Sometimes, you may be provided with an ArcGIS Project file (with a .aprx file indicator). Opening this will also allow you to access any attached notebooks that were previously embedded within the project.
How to Execute Code in a Notebook
-
Write your code:
-
In a notebook cell, type your Python code using standard syntax (e.g., importing libraries, defining variables, running functions).
-
Cells can be initialized as code, markdown, or raw.
-
Code cells are what you would use to input Python language. These types of cells are denoted by [ ].
-
Markdown cells are what you would use to format text using the markdown language. Options like bolding or italicizing are available to you in these cells. Elements like images, videos, or other explanatory content are also formattable here.
-
Raw cells are not executed by the notebook. They will be passed over when running.
-
-
-
Run the Code:
-
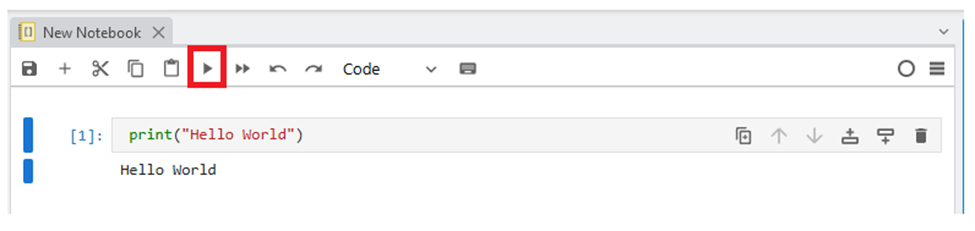
To execute the code in a cell, press Shift + Enter or Control/Command + Enter, or you can use the Run button within the notebook toolbar.
-
The output of the code (such as calculations, tables, visualizations, etc.) will appear directly below the cell in which you ran.
-
-
Running the Entire Notebook
-
If you'd like to execute all cells at once, you can use the Run All option found in the Command Palette menu dropdown.
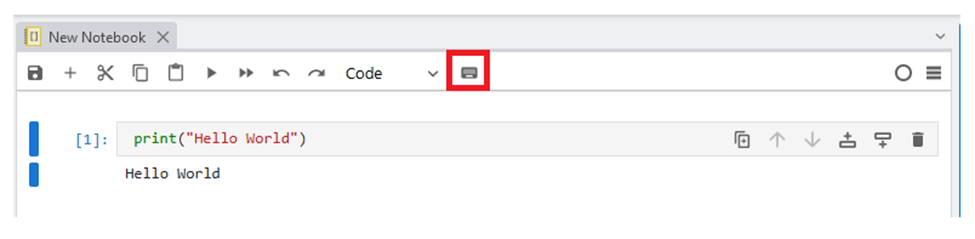
-
The Command Palette contains many functions useful to users, such as duplicating cells or merging code together. One of the first functions you may need will be the Insert Cells, which allows you to add additional cells in your notebook. FYI – many of these functions have keyboard shortcuts, which you can identify within the Command Palette.
-
Saving and Sharing Notebooks
Saving a Notebook
Saving your work can be done by clicking Save or Control + S. As previously mentioned, your work will be saved as an .ipynb file. Note: when saving a file, it captures the notebook in its current state, meaning outputs will be saved at their current version. You can always clear all outputs or run the entire notebook for an updated file save.
Sharing a Notebook
You can share your notebook by exporting it or providing access to the notebook file. Notebooks are saved in the same file directory as your ArcGIS Project. If you're working in a shared project, team members can access the same notebook.
Getting Started with ArcPy
ArcPy is a Python library/package created by GIS users that enables geospatial analysis, data processing, and workflow automation. Note that ArcPy is a package that is part of the default Python distribution within ArcGIS Pro. If ArcGIS Pro is not installed and licensed, ArcPy functions will not execute.
Here are some starters for ArcPy in notebooks using ArcGIS Pro:
- Be sure to add your layers to the map view if you want to see changes parallel to your code.
- Layers not presently in the active map view can be refenced by using the file path.
- There are different ways to add your data from the file path:
- r"C:\Tutorials\NotebooksArcPro\Test.gdb\shapefile"
- "C:/Tutorials/NotebooksArcPro/Test.gdb/shapefile"
- "C:\\Tutorials\\NotebooksArcPro\\Test.gdb\\shapefile"
- You can set your working environment/directory by running this line of code
- "arcpy.env.workspace = "Your Environment"
- Remember to use one of the specific encoding methods above.
-
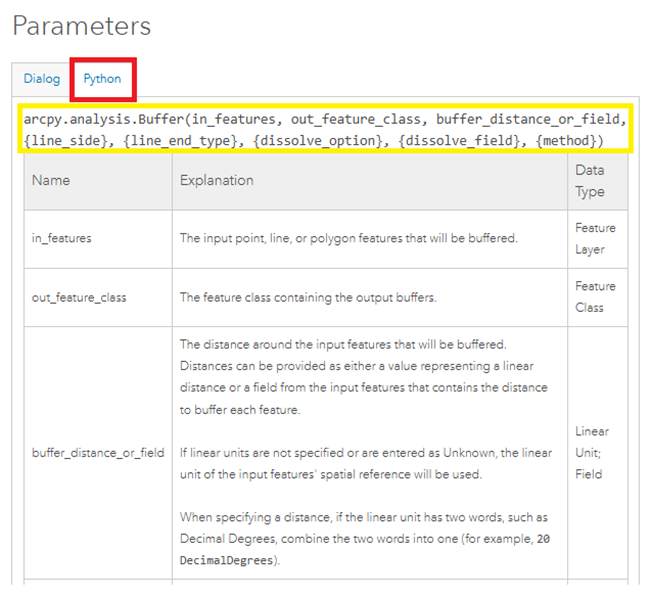
Geoprocessing tools parameters and additional documentation are always viewable alongside regular usage on the ArcGIS webpage.
-
Here is an example of the Buffer Tool, where the ArcPy tool is available with required and optional parameters listed.
-
-
Verify if you want to enable features to be overwritten. This can be changed by running this line of code to modify the environment settings: arcpy.env.overwriteOutput = True.
Tips and Best Practices
Below are a few pointers on guidelines for working in Notebooks through ArcGIS Pro. As with any project (especially with programming), things can get messy and unorganized. There are tools and practices users can adopt to streamline their work.
- Using Python libraries:
- ArcGIS Pro notebooks supports standard Python libraries such as pandas, geopandas, numpy, and matplotlib as well as the ArcGIS suite of geoprocessing tools like arcpy.
- Libraries offer functions that simplify coding actions.
- You can add these to your project by importing them ex. [import pandas as pd]
- Organize Code with Cells:
- You can split your code into multiple cells for better organization and easier debugging.
- Comment, Comment, Comment
- Commenting is a powerful yet often overlooked practice in coding projects.
- They help to communicate what blocks of code do to others and yourself.
- You can create a comment using the # symbol before your code begins.
- Visualize Results:
- Notebooks allow you to display visualizations like maps and charts in line with your code, which can help you better understand you data as you work.
- For example, if you wanted to look at the data distribution of your data before deciding upon a classification scheme, you can create a histogram.
Additional Resources and Further Reading
Wondering if Notebooks and Python is for you? Here are some more resources about how you can implement and use notebooks for your work.
- Esri Lesson | Getting Started with Notebooks in ArcGIS Pro
- Esri Tutorials | Learn Python with ArcGIS Notebooks
- Esri Academy | ArcGIS Notebooks Basics
- Esri Documentation | What is ArcPy?
- ArcGIS Blog | Introducing ArcGIS Notebooks in ArcGIS Pro
- FAQ for ArcGIS Notebooks
- Examples of ArcGIS Notebooks
- Map and Data Library sample ArcGIS Notebooks | https://github.com/MDLutoronto/ArcGISPro-Notebooks